Per il blog di CraftyIndividuals, mi sono fatta ispirare da questo bellissimo timbro CI-360, in tema Halloweiano ma non solo:
For CraftyIndividuals' blog I found inspiration on this apothecary/Hallowen stamp CI-360 , that you can use in different ways:
Mettete insieme una scatolina di cartone (avete presente le librerie Billy Ikea? Le scatoline con le viti?), un timbro, un po' di colori a spruzzo ed ecco qui la mia ultima alterazione:
I altered a cardboard box found on a Ikea furniture package: Dylusion inks, some stamped details, a little bit of crackle' paste and here's my little apothecary suitcase:
Ma che c'e' dentro?
What's inside?
Le voila':
E visto che questo timbro mi piaceva tanto ho deciso di farne un giocoso braccialetto:
And since I liked so much this stamp I created a little bracelet out of shrink plastic:
And don't forget today on CraftBarn starts the 2013 Calendar Challenge! Full details here.
E da oggi parte la sfida su CraftBarn per il Calendario 2013. Per chi partecipa ogni singola settimana c'è lo sconto del 15% sullo shop. E chi riesce a fare tutte e 12 le settimane, c'è l'estrazione di un premione finale.
domenica 30 settembre 2012
martedì 25 settembre 2012
2013 Calendar-January/Gennaio
Pensavate di scamparvela quest'anno? Eh no! Questa settimana su CraftBarn usiamo il Vellum (carta da lucido?) per le nostre creazioni ed io comincio il mio calendario:
Didn't you think to skip it this year, did you? Nononono :-) So this very week starts the calendar 2013 on CraftBarn, different versions and inspiration from my DT mates, hope you enjoy it.
The material on the spot is Vellum , quite unusual material to use, but very interesting.
My interpretation:
Here's a simple step by step
Qui il passo passo
Qui potete trovare il calendario fatto in Excel da me, oppure se non vi va di stamparlo ci sono i piccoli calendarietti della Anita sullo shop.
I made the 2013 calendar, free to use, or if you are too lazy to print it, there's the nice and cheap version on the shop
Calendario Excel 2013 (4Shared)
Calendario Excel 2013 (DropBox)
The Special offer on the shop this week.
And my new attempt at the fabric journal, inspired by the latest challenge on Scrappin' Sisters: Tempus Fugit
There's still time to participate!
C'è ancora tempo per partecipare :-)
Didn't you think to skip it this year, did you? Nononono :-) So this very week starts the calendar 2013 on CraftBarn, different versions and inspiration from my DT mates, hope you enjoy it.
The material on the spot is Vellum , quite unusual material to use, but very interesting.
My interpretation:
Here's a simple step by step
Qui il passo passo
Qui potete trovare il calendario fatto in Excel da me, oppure se non vi va di stamparlo ci sono i piccoli calendarietti della Anita sullo shop.
I made the 2013 calendar, free to use, or if you are too lazy to print it, there's the nice and cheap version on the shop
Calendario Excel 2013 (4Shared)
Calendario Excel 2013 (DropBox)
Materials I used:
Dreamweaver metallic F/X: Glacier lake, Pink blush, Kiwi
Katzelkraft unmounted rubber stamps - Art-Nouveau
Zig BrusH2O Waterbrush: Detailer
Sizzix Textured Impressions Embossing Folders - Daisy Blast and Paisley Palooza Set
Vintaj Charms and embellishments: 15X21mm Diamond Filigree
Vintaj Patina kit: Victorian Gable
The Special offer on the shop this week.
You will see during this vellum week that Isa'sArt is using the metal tools on her vellum
(Pergamano style), so we are offering 10% off a couple of tool kits so you can have a go at this technique.
Use the code VELLUM10 at checkout
There's still time to participate!
C'è ancora tempo per partecipare :-)
domenica 23 settembre 2012
September's Heart
E nove, ma la mia parete e' quasi piena...
La mia interpretazione di questo mese, purtroppo con un piccolo errore, me ne sono accorta troppo tardi, peccato!
Nine!! My interpretation for this month, unfortunately with a little mistake, I realized it too late...
I cut the heart from a piece of corrugated cardstock, peeling it along the border. Ho tagliato il cuore da del cartoncino corrugato
I adhered some stuffing ( no cotton ball)
Ho incollato dell'imbottitura
I covered the heart with a piece of previously painted fabric, cut and sewed to the cardstock
Ho ricoperto con un pezzetto di stoffa decorata precedentemente e l'ho cucita e ritagliata
I started to cut the little hearts from a piece of newspaper..
and here I realized that I made a big mistake, the background had to be made of newspaper and the little hearts of fabric...No way to start again, it was a shame, since it was a brilliant and original idea (and no sewing machine required)!
Ho cominciato a ritagliare i cuori da pezzi di giornale, e qui ho realizzato che il tutorial originale richiedeva di fare il cuore grande di giornale e il piccolo di stoffa, vabbe' troppo tardi per tornare indietro :-(
E da domani su CraftBarn...il calendario 2013!!
And tomorrow starts the 2013 calendar on Craftbarn!
Domenica prossima il challenge, spero vorrete partecipare in tante!
The first challenge will be up next Sunday, we hope to inspire you to participate :-)
Etichette:
Altered,
Fabric,
Hearts,
Mixed media,
Stamping
giovedì 20 settembre 2012
Mirror, Mirror../Specchio specchio...
L'avete visto il film? A me è piaciuto molto anche se c'erano degli zotici in sala d'ammazzarli!
Have you seen the movie, I love it, so gothic, unusual and a bit romantic:
And speaking about mirrors...
New wonderful products on the shop, the Pebeo Fantasy paints, here I used the Prisme ones.
Just pour and mix a little bit, to get a shining, colourful surface:
E a proposito di specchi, sono arrivati sullo shop i colori Fantasi della Pebeo, e io li ho usati per decorare uno specchio, pochissimi abbellimenti, per ottenere una superficie brillantissima e variegata :
Here you can find the step by step.
Qui il passo passo.
Materials I used:
And another treat for those are on FB : a Facebook candy!!:
Have you seen the movie, I love it, so gothic, unusual and a bit romantic:
And speaking about mirrors...
New wonderful products on the shop, the Pebeo Fantasy paints, here I used the Prisme ones.
Just pour and mix a little bit, to get a shining, colourful surface:
E a proposito di specchi, sono arrivati sullo shop i colori Fantasi della Pebeo, e io li ho usati per decorare uno specchio, pochissimi abbellimenti, per ottenere una superficie brillantissima e variegata :
Here you can find the step by step.
Qui il passo passo.
Materials I used:
And the special offer this week on the shop is
10 % off Pebeo paints
Enter the code PEBEO10 at checkout
And another treat for those are on FB : a Facebook candy!!:
Etichette:
Altered,
DT Craft Barn,
Tutorial
giovedì 13 settembre 2012
Die or die!
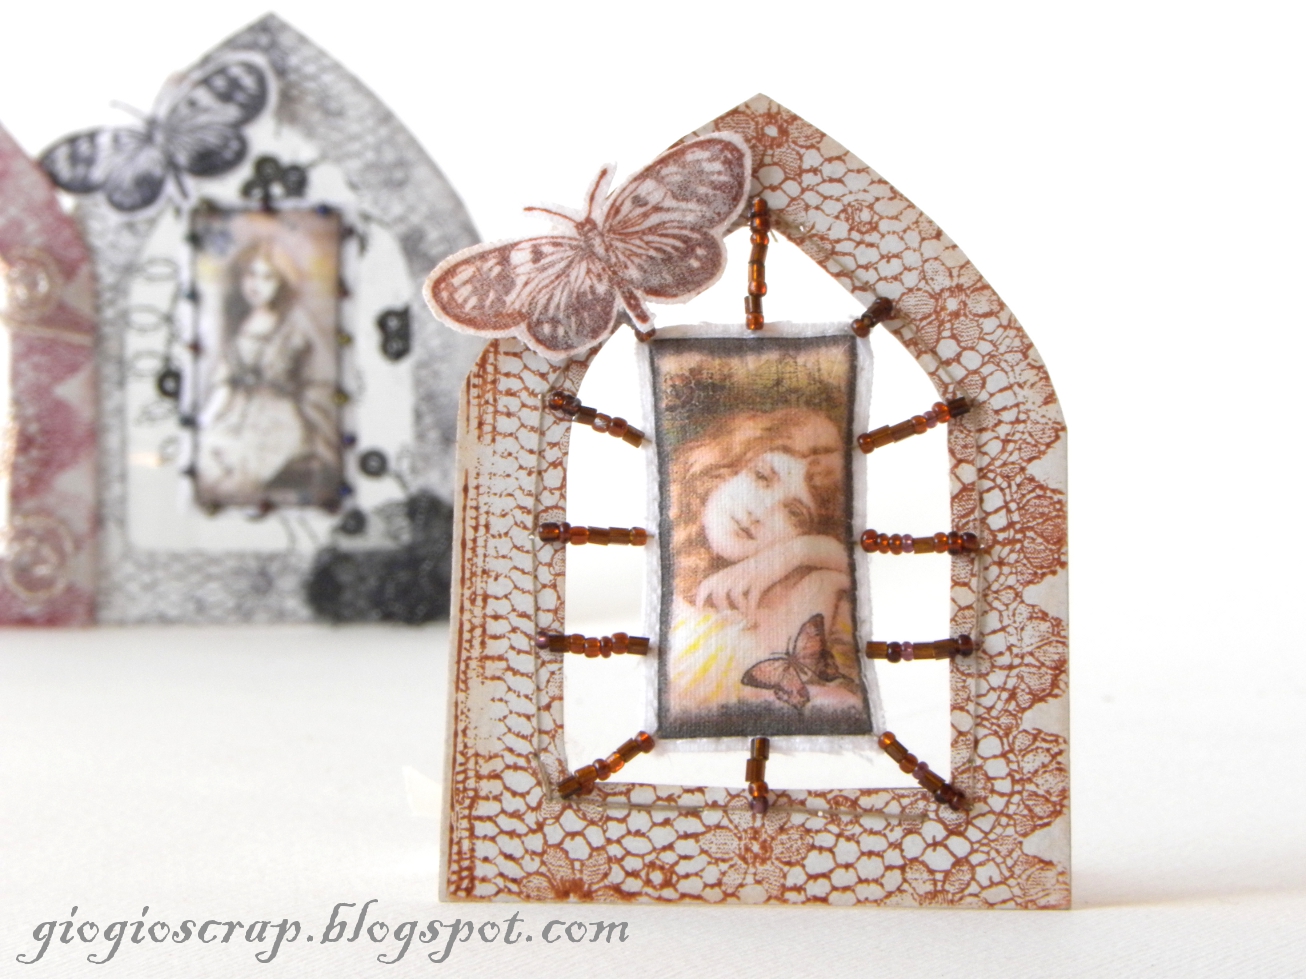
Vabbe' si è capito, le mascherine da taglio (die) non sono le mie preferite, anche se ammetto semplificano molto la vita! Questa settimana su CraftBarn le usiamo e sono a tema animal, ma siccome non c'erano gatti ho optato per qualcosa di vintage, ma virato al black and white
Ho alterato due mini moleskine e visto che c'ero anche una card. Grazie Roberta per l'aiuto prestatomi!
Ok, I think it's clear now that dies are not my cup of tea...even if sometimes could be useful. This week at CraftBarn we're using them and the main theme is Animal. Since I couldn't find any cat die ( no animal are harmed, by the way), I ended using a vintage one, with a black and white combo.
I altered two little moleskine and, since I had tons of die cuts ( thanks Roberta :-)), a card:
Here's the simple step by step.
Qui il passo passo.
Materiali usati :
When I saw the first altered mouse-trap on the web I was so inspired to make one, but after a wandering from shop to shop I couldn't find any (these are only metallic and not wooden one). When I friend of mine, Gina, found me twos I was so happy! ( at my question 'Where did you find them?' she answered 'In front of your office').
This is my alteration and a quick tutorial:
Era da un pò che desideravo alterare delle trappoline per topi, ma purtroppo non riuscivo a trovarle da nessuna parte (solo metalliche ormai), quando un giorno, la mia cara amica Gina me ne regalate due! Alla mia domanda ma dove cavolo le hai trovate? Risposta serafica: di fronte al tuo ufficio ( Leroy-Merlin per le romane). Ecco la mia interpretazione, ne è una venuta fuori una card di compleanno sui generis ( nel mollettone ho messo un post-it con gli auguri)
I cut the central part/ Ho tagliato il perno centrale:
I painted it with acrylic paint/ Ho dipinto la base
I changed my mind and covered with a dictionary page/ Ho cambiato idea e l'ho ricoperta
I distressed a little bit/ L'ho distressata
I glued the main image/ Ho incollato l'immagine
I sticked on the back some pieces of magnet tape/Ho incollato sul retro dello scotch magnetico
I embellished/Ho aggiunto delle perline
Ho alterato due mini moleskine e visto che c'ero anche una card. Grazie Roberta per l'aiuto prestatomi!
Ok, I think it's clear now that dies are not my cup of tea...even if sometimes could be useful. This week at CraftBarn we're using them and the main theme is Animal. Since I couldn't find any cat die ( no animal are harmed, by the way), I ended using a vintage one, with a black and white combo.
I altered two little moleskine and, since I had tons of die cuts ( thanks Roberta :-)), a card:
Here's the simple step by step.
Qui il passo passo.
Materiali usati :
Sizzix Sizzlits Die Set 3PK - Decorative
vintage set
Cosmic Shimmer Aurora Embossing powder: viola
black
Woodware clear stamp: Alphabet
background
Glass bead mix: Metallic
Viva Pardo jewellery clay: copper
Fresco Finish Paint London
bus
Kanban
clear rubber stamps -
Winged heart, Romantic couple
Barn
Door Distress ink
Versamark ink pad
E l'offerta di questa settimana sullo shop:
The special off this week on the shop
Spend £30 on Sizzix products between Sept 10th and 17thand get a £5 voucher back
(you will find it in your parcel)
Era da un pò che desideravo alterare delle trappoline per topi, ma purtroppo non riuscivo a trovarle da nessuna parte (solo metalliche ormai), quando un giorno, la mia cara amica Gina me ne regalate due! Alla mia domanda ma dove cavolo le hai trovate? Risposta serafica: di fronte al tuo ufficio ( Leroy-Merlin per le romane). Ecco la mia interpretazione, ne è una venuta fuori una card di compleanno sui generis ( nel mollettone ho messo un post-it con gli auguri)
I cut the central part/ Ho tagliato il perno centrale:
I painted it with acrylic paint/ Ho dipinto la base
I changed my mind and covered with a dictionary page/ Ho cambiato idea e l'ho ricoperta
I distressed a little bit/ L'ho distressata
I glued the main image/ Ho incollato l'immagine
I sticked on the back some pieces of magnet tape/Ho incollato sul retro dello scotch magnetico
I embellished/Ho aggiunto delle perline
Etichette:
Altered,
DT Craft Barn,
Stamping,
Tutorial
martedì 11 settembre 2012
Summer & Lavender
And the new challenge at the CraftyIndividuals blog is : "The last days of summer". Hope my artwork could be inspiring for you as the ones inspired me in the past when I participate.
Un nuovo challenge sul blog di CraftyIndividuals 'Ultimi giorni dell'estate', spero i miei lavori siano di ispirazione così come lo stati nel passato quelli proposti dal DT quando io partecipavo!
Several months ago I moved outside Rome and I have the lucky to live in a small building with a garden with lots of Lavender plants..So during the night, every night, I stolen little branch of it to make these little lavender sachets.
Qualche mese fa mi sono trasferita fuori Roma, e il giardino condominiale era pieno di piante di lavanda. E cosi' ogni volta capitava l'occasione ne tagliavo qualche pezzetto e lo mettevo ad essiccare. Ed ecco quindi i miei sacchetti di lavanda.
I linked some to hanging in the closet:
Appesi ad una gruccia per metterli nell'armadio:
And with the leftovers of fabric I decorated a little wooden crate.
Con gli avanzi di stoffa ho decorato un piccolo contenitore di legno:
Before
After/Dopo
This month there's a double treat on CraftyIndividuals' blog: everyone who enters a project in the Challenges can claim a massive 25% discount voucher code, which will last for the whole of the Challenge month and to celebrates the new stamps and masks there's a candy! Why not try?
E questo mese per chiunque partecipa al challenge 'Ultimi giorni d'estate' c'è lo sconto del 25% su tutto lo shop e per festeggiare i nuovi timbri e maschere da taglio un blog candy. Perchè non partecipare? Non si sa mai!
Etichette:
Altered,
DT Crafty Individuals,
Stamping
martedì 4 settembre 2012
TAP Paper
E per le amanti dei lavori con la stoffa, ma non solo, questa settimana CraftBarn è dedicata alla TAP paper. Cos'è? E' una speciale carta che si timbra o si passa nella stampante a getto d'inchiostro di casa e trasferisce in maniera perfetta sulla stoffa. Io ci ho fatto una cosa piccolissima (era la prima volta che la usavo) ma in testa mi stanno frullando mille idee!
Qui il passo passo.
And this week at CraftBarn we're using TAP! Transfer Artist Paper is a premium quality transfer paper that allows you to transfer images to virtually any surface with the heat of an iron. I used it on fabric, and you get a perfect transfer in a ...swishhhh of the iron (this is the only time that i like to use it!).
I was inspired to do some Gothic Arches, there's everything on it, stitching, wiring...ironing :-)
Here's the step by step.
Since I used the lovely images from CraftyIndividuals there's a little copyright note:
I used:
Qui il passo passo.
And this week at CraftBarn we're using TAP! Transfer Artist Paper is a premium quality transfer paper that allows you to transfer images to virtually any surface with the heat of an iron. I used it on fabric, and you get a perfect transfer in a ...swishhhh of the iron (this is the only time that i like to use it!).
I was inspired to do some Gothic Arches, there's everything on it, stitching, wiring...ironing :-)
Here's the step by step.
Since I used the lovely images from CraftyIndividuals there's a little copyright note:
COPYRIGHT
A little note from Crafty Individuals:
You are welcome to scan, resize, and print any of our images onto TAP
paper for your personal use only, including selling your hand crafted
items. But please don’t sell printed TAP, using our images, or offer our
images themselves for downloading on the internet, as we do own the
copyright.
I used:
Crafty Individuals images - Domino
CI-350- Lace
CI-347- Row of butterfly
Rocaille
beads mix: Jets
and Mahogany
E se vi va di fare una paginetta dell'AJ, e' partito il nuovo challenge su CraftBarn, e questo e' il premio:
And there's a new journal challenge over at the Craft Barn and this is the wonderful prize:
And the offer on the shop this week is :
E l'offerta di questa settimana sull shop è sui Distress Stain, sono arrivati i nuovi metallizzati, non vedo l'ora di provarli!
And there's a new journal challenge over at the Craft Barn and this is the wonderful prize:
La mia interpretazione, veloce rilassante, fatta di avanzi:
My interpretation, quick, relaxing, made of leftovers:
And the offer on the shop this week is :
E l'offerta di questa settimana sull shop è sui Distress Stain, sono arrivati i nuovi metallizzati, non vedo l'ora di provarli!
The special offer this week will be 15% off Distress Stains
Enter the code DISTRESS15 at checkout
I just ordered the new metallic stains, can't wait to try them!
Iscriviti a:
Post (Atom)


.jpg)


